How to Create AWS VPC in 10 steps, less than 10 min
AWS Virtual Private Cloud & it’s resources with detailed explanation with Video.
Hi All,
Today, I am explaining about the AWS VPC and its related resources. in this Step by step VPC creation Tutorial, you will learn the following:
- Details definition of all related resources.
- Implementation of all resources.
- Integration between each resource.
- In the end, you can find the cleanup activity.
Clarify the Business Value & Business Reason why someone would go for this Demo:
The security of cloud infrastructure is a big deal in for any company.So It is always preferable to use your own custom network setting in your cloud and make it more secure as pe the cloud best practice guideline.
Also, in Hybrid infrastructure company wants the compatible network range (CIDR) in the cloud, to build a hybrid solution, where this kind of Custom VPC creation will help you a lot. You can get more control over your custom VPC from the management point of view.
Pre Requisites:
- AWS Account.
- You may have some knowledge about basic AWS services like EC2.
- Networking knowledge is required (6-month Experience).
Virtual Private Cloud
Amazon VPC lets you provision a logically isolated section of the Amazon Web Services (AWS) cloud where you can launch AWS resources in a virtual network that you define. You have complete control over your virtual networking environment, including a selection of your own IP address ranges, creation of subnets, and configuration of route tables and network gateways. You can also create a hardware Virtual Private Network (VPN) connection between your corporate datacenter and your VPC and leverage the AWS cloud as an extension of your corporate datacenter.
Components of Amazon VPC
Amazon VPC comprises a variety of objects that will be familiar to customers with existing networks:
- A Virtual Private Cloud: A logically isolated virtual network in the AWS cloud. You define a VPC’s IP address space from the ranges you select.
- Subnet: A segment of a VPC’s IP address range where you can place groups of isolated resources.
- Internet Gateway: The Amazon VPC side of a connection to the public Internet.
- NAT Gateway: A highly available, managed Network Address Translation (NAT) service for your resources in a private subnet to access the Internet.
- Route Table: A route table contains a set of rules, called routes, that are used to determine where network traffic from your subnet or gateway is directed.
- DNS Hostname: The Amazon DNS server resolves a public DNS hostname to the public IPv4 address of the instance outside the network of the instance.
- CIDR: Classless Inter-Domain Routing
Architecture / Block Diagram

Below are the 10 steps to Create and Verify your VPC
Step 01. Create a VPC
Step 02. Create 2 Public Subnet & Create 2 Private Subnet
Step 03. Create IGW (Internet Gateway) & Attach to the VPC
Step 04. Create Public and Private Route Table
Step 05. Add IGW in Public Route table (0.0.0.0/0)
Step 06. Add Public Subnet (1a & 1b) in Route table
Step 07. Create a NAT Gateway in Public Subnet
Step 08. Add NAT GW into the Private Route Table
Step 09. Add Private Subnet in Private Route Table
Step 10. Launch EC2 in this VPC & Validate your Connection
Optional Steps:
Step 11. Edit DNS Resolution and Hostname
Step 12. Cleanup the VPC Resources
Let’s start the implementation.
Step 01. Create a VPC
- Login to your AWS Console.
- Create your VPC with Valid CIDR and name.

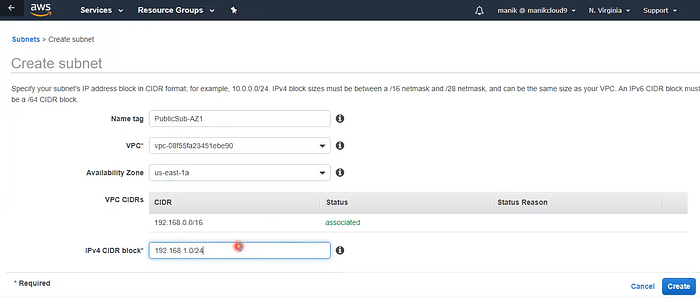
Step 02. Create 2 Public Subnet & Create 2 Private Subnet
- Click Subnet and create your Subnet with:
- Public Subnet 1 and Public Subnet 2 valid Name & VPC.
- Valid Subnet range which is valid IPv4 CIDR Block.
- Repeat steps 2 & 3, with Private Subnet too.
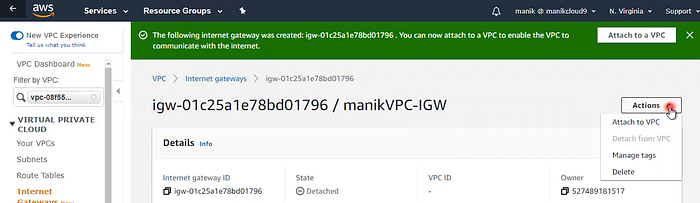
Step 03. Create IGW (Internet Gateway) & Attach to the VPC
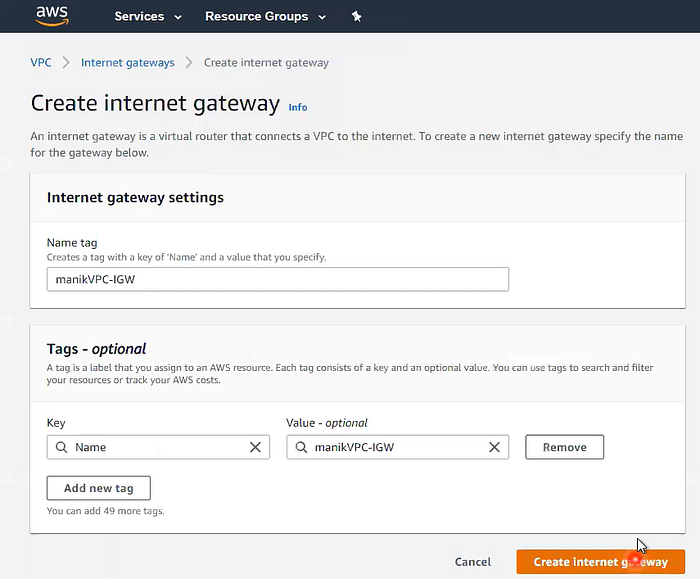
- Once IGW create, then attached this IGW in VPC
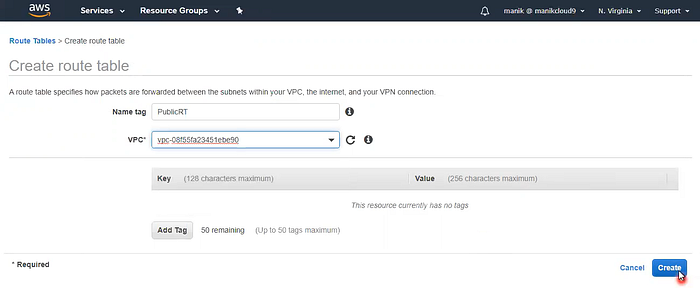
Step 04. Create Public and Private Route Table
Route table concepts
The following are the key concepts for route tables.
- Main route table — The route table that automatically comes with your VPC. It controls the routing for all subnets that are not explicitly associated with any other route table.
- Custom route table — A route table that you create for your VPC.
- Edge association — A route table that you use to route inbound VPC traffic to an appliance. You associate a route table with the internet gateway or virtual private gateway, and specify the network interface of your appliance as the target for VPC traffic.
- Route table association — The association between a route table and a subnet, internet gateway, or virtual private gateway.
- Subnet route table — A route table that’s associated with a subnet.
- Gateway route table — A route table that’s associated with an internet gateway or virtual private gateway.
- Local gateway route table — A route table that’s associated with an Outposts local gateway. For information about local gateways, see Local Gateways in the AWS Outposts User Guide.
- Destination — The range of IP addresses where you want traffic to go (destination CIDR). For example, an external corporate network with a
172.16.0.0/12CIDR. - Target — The gateway, network interface, or connection through which to send the destination traffic; for example, an internet gateway.
- Local route — A default route for communication within the VPC
- Create a Route table in the same VPC.
- Make sure you selected the right VPC and give a proper tag.
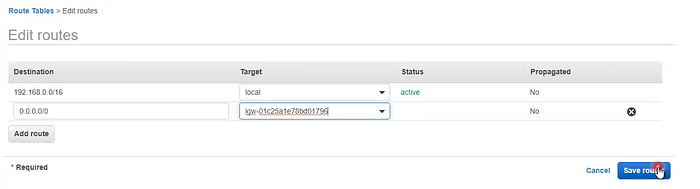
Step 05. Add IGW in Public Route table (0.0.0.0/0)
- Click on the Public route table and click on the edit button.
- Click on Add route from 0.0.0.0/0
- Select Internet gateway from Target drop-down menu.
- Click on save the routes.
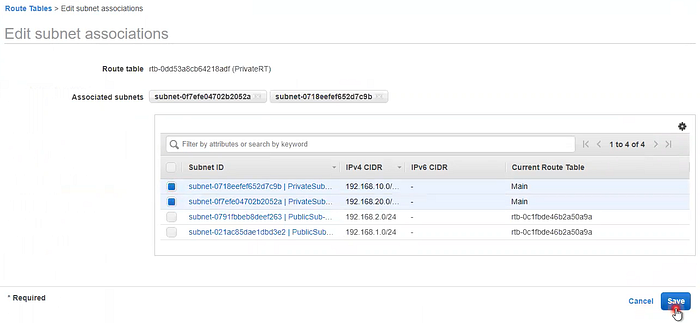
Step 06. Add Public Subnet (1a & 1b) in Route table
- Edit the Subnet Association.
- Select the Public Subnet checkbox.
- Click on the Save button.
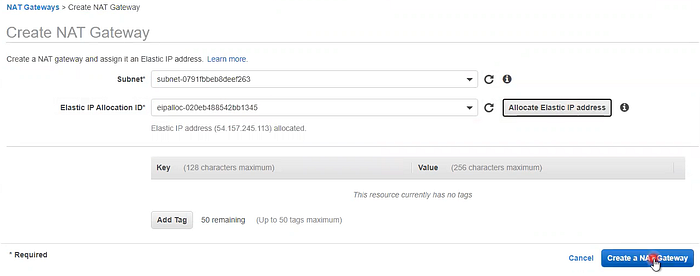
Step 07. Create a NAT Gateway in Public Subnet
- Select a Public Subnet
- Create a new Elastic IP and associate
- click on Create NAT Gateway
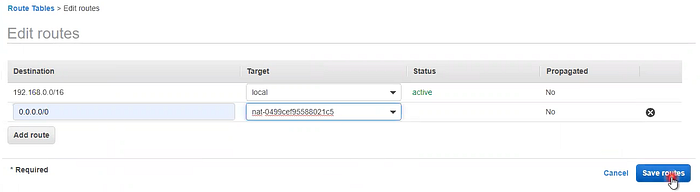
Step 08. Add NAT GW into the Private Route Table
- Click on the Private route table and click on the edit button.
- Click on Add route from 0.0.0.0/0
- Select nat gateway from Target drop-down menu.
- Click on save the routes.
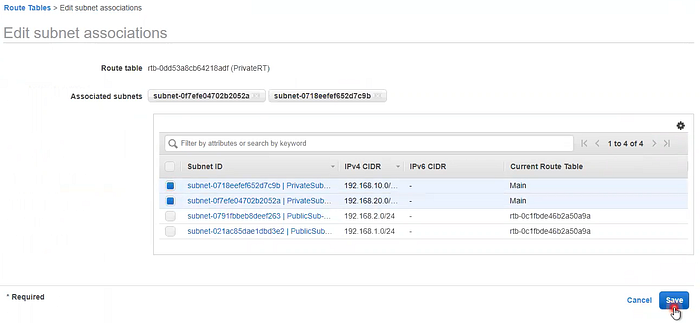
Step 09. Add Private Subnet in Private Route Table
- Edit the Subnet Association.
- Select the PrivateSubnet checkbox.
- Click on the Save button.
Step 10. Launch EC2 in this VPC & Validate your Connection
- Download the putty & puttygen software to your windows server.
- Change your pem file to ppk extension.
- Connect from you putty
OR
- Connect with your MAC or Linux Machine with the below command.
chmod 400 file_name.pem
ssh - i file_name.pem ec2-user@your_pubilc_vm_ip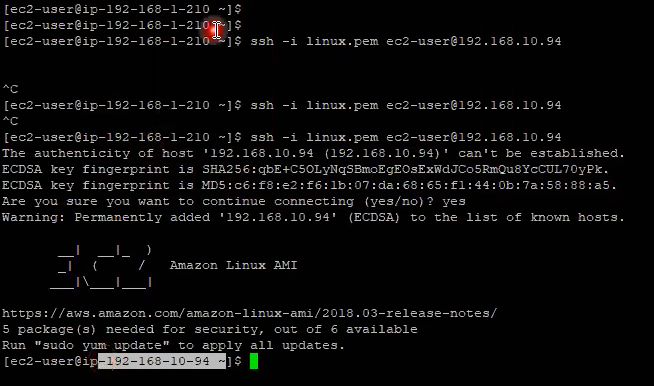
Once connected to your public instance you can copy your pem file to this instance and run the following command to connect to your private instance.
chmod 400 file_name.pem
ssh - i file_name.pem ec2-user@your_private_vm_ip
Then try to connect with the internet in a private instance.
yum update -y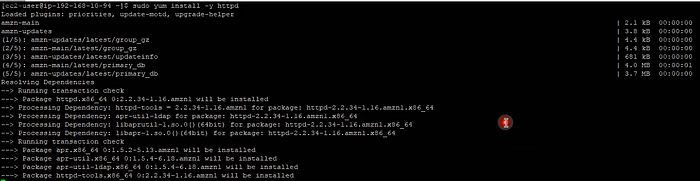
If you are able to connect with a Private instance and able to update the instance. This means you are successfully Created your VPC and Public & Private subnets with the proper connection of your IGW/ NGW & Route Table.
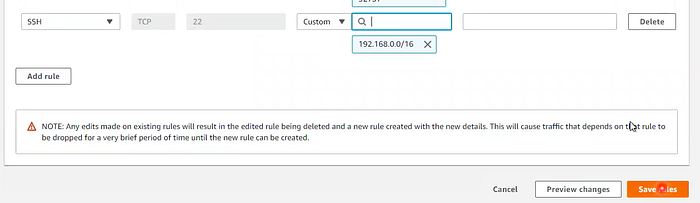
In case of any error, Add VPC CIDR Range in your Security Group.
You need to open the port no. 22 from your Home IP address & the VPC CIDR range to access the Public instance.
Access your private instance from your public instances.
Optional Steps:
Step 11. Edit DNS Resolution and Hostname
When you launch an instance into a default VPC, we provide the instance with public and private DNS hostnames that correspond to the public IPv4 and private IPv4 addresses for the instance. When you launch an instance into a nondefault VPC, we provide the instance with a private DNS hostname and we might provide a public DNS hostname.
A public (external) DNS hostname takes the form ec2-public-ipv4-address.compute-1.amazonaws.com for the us-east-1 Region, and ec2-public-ipv4-address.region.compute.amazonaws.com for other Regions. The Amazon DNS server resolves a public DNS hostname to the public IPv4 address of the instance outside the network of the instance, and to the private IPv4 address of the instance from within the network of the instance.
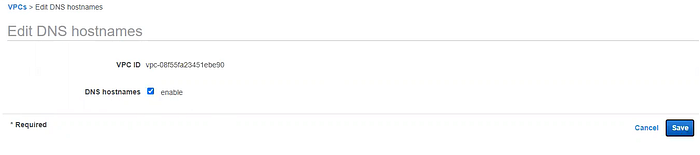
- Click on Action and Edit DNS hostname
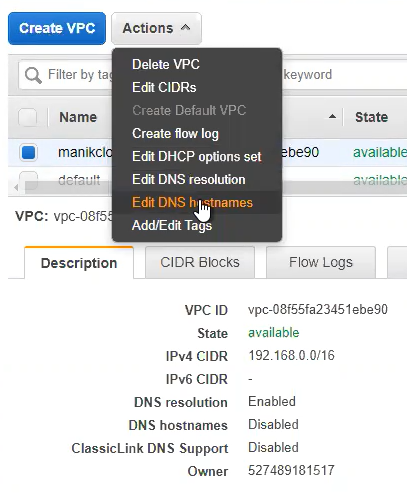
2. Checkmark on DNS Hostname and click on save.
Before ENABLE DNS HOSTNAME:
There is no Public DNS. Highlighted in yellow color.
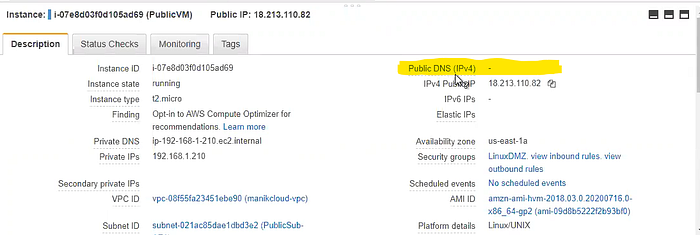
After Enable DNS HOSTNAME:
You can see the changes in the blue color, with Public DNS (IPv4)

Step 12. Cleanup the VPC Resources
If you want to delete your VPC after Clicking on Delete button, you will get below errors:
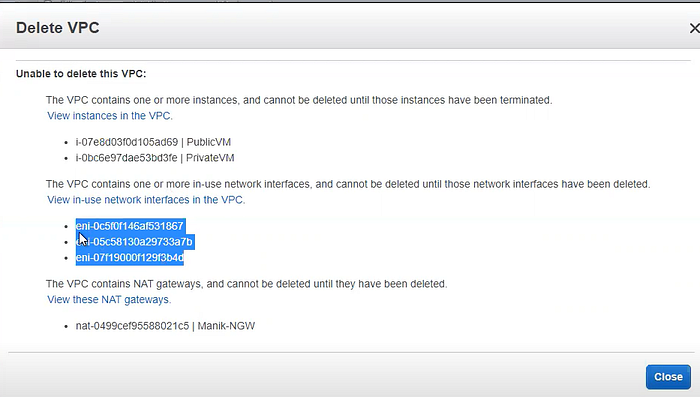

There are the hierarchy of steps, available to delete you VPC
- Terminate EC2 instances, which will remove the network interface card (NIC), attached with Private or Public IP
- Remove Elastic IP
- Terminate NAT Gateway
- Dtattached Internet Gateway (IGW)
- Delete IGW
- At last, you can Delete your VPC, and this step will delete all the related VPC resources.

Part One: Please find the VPC Creation Video.
Part Two: Please fine the DNS Hostname & VPC Cleanup Video
Conclusion:
In This Blog, I have successfully shown the below:
- VPC Creation, Subnet Creation, IGW, NGW, Route table.
- Subnet association & IGW/NGW Attachment with Route Table.
- EC2 instance connectivity with the private and public subnet
- DNS Hostname Setup.
- VPC Clean up Activity.
For more info please connect & Follow me:
LinkedIn: https://www.linkedin.com/in/vkmanik/
Email: varunmanik1@gmail.com
Facebook: https://www.facebook.com/cloudvirtualization/
YouTube: https://bit.ly/32fknRN
Twitter: https://twitter.com/varunkmanik